Showing posts with label Christmas/Winter. Show all posts

Tuesday, March 4, 2008

March Blog Challenge - 2008

Here is the challenge for March... I know I'm a few days late but I'm still doing better then last month.


The challenge for this round is to make a card or scrapbook page using the One Sheet Wonder (OSW) technique. Basically you create your own designer paper by stamping a variety of images in a variety of colors. You can use as many or as few images and colors as you but once you're sheet is stamped to you liking, you then get to cut it up to make several cards. The number of cards you can make using a OSW depends on how big the piece of stamped paper is and how big of pieces you cut them into. I've seen people take 1 sheet of 12x12 paper and come up with as many as 10-20 cards. For my card I only got 4-6 cards from a sheet because I used a 8 1/2 x 11 piece of paper and I didn't have the exact measurements figured out when I started cutting. I know bad me. I could have used the scraps to make a card with a different layout then the one attached her but this was the card I wanted to make so I didn't use the scraps. The reason for the lack of measurements before hand was because I was casing the card and didn't follow the original design exactly. Sorry I can't recall at this time who it was I cased it from. They did a wonderful job and though I changed a few things I didn't change much.

Challenge Requirements... Please email me your designs no later then 9pm on March 31st. All those who submit cards that use the OSW technique will have their names put into a paint can and a winner will be drawn at random. I will announce the winner the first week in April. The winner of the challenge will win a set of cards designed by me using the OSW technique. Please put Faye's Blog Challenge in the subject line so I don't miss it by mistake in my mail box.

Card Recipe:
Stamps: Big Pieces, Sincere Salutations, Snow flurries
Paper: Real Red, Whisper White, Garden Green
Ink: Garden Green, Real Red
Accessories: Non SU Brad, Ribbon, Button, Retired SU Silver Cord
Techniques: OSW
Difficulty (1-Easy 5-Advanced): 1

Monday, January 28, 2008

December Technique Class - 2007

Another month of Christmas projects created during my upline's technique class.


Working on all these Christmas projects definitely helped me get into the Christmas spirit and come up with some new ideas for next year when I get ready to make some gifts for my friends and family. I wish more of my family understood the hard work and energy that goes into making a gift so that they actually enjoyed the gift a bit more but oh well... such is life I guess.

I think my favorite projects were the gift bags. I think the little bag with the tags is so cute and could definitely be changed to fit any holiday or celebration. The same goes for the big gift bag but the tags were something new to me so I really was in awe by them.


Banner Recipe:
Paper: DP Dashing, Real Red
Accessories: On Board Accents, Ribbons, Dimensionals
Difficulty (1-Easy 5-Advanced): 1
Tag Bag Recipe:
Stamps: Perfect Presentation
Paper: Wintergreen DP, Whisper White, Brushed Silver
Ink: Old Olive, Basic Black
Accessories: Circle & Scallop Punches, Corner Rounder
Difficulty (1-Easy 5-Advanced): 1
Gift Bag Recipe:
Stamps: Jumbo Snowflake, Big On Christmas, Snow Wheel
Paper: Whisper White, Night of Navy, Retired DP
Ink: Silver Encore, Basic Black, Night of Navy
Accessories: Corner Punch, SU Markers, Silver EP
Difficulty (1-Easy 5-Advanced): 1

November Technique Class - 2007

November was another month filled with Christmas projects that would make great gifts.


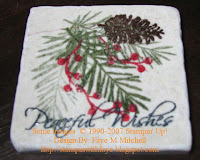
Though I liked making the gift card holder i found it to be a bit tricky and think that there are other gift card holders out there that would work better and be cuter. That's my personal opinion though for what it's worth. I did like the marble tile and actually bought some of them to try to make some more as gifts. I didn't end up having enough time or the craft ink in the colors I wanted to make them for gifts this year but next year I think I'll be making a few for some different people. I really like the set we used here but I don't know if I would use it for anything else and don't really want to spend the money to buy it for just this one project. I'm sure some of you understand where I'm coming from.

Like the past few months entries. We also made a card using the reverse Joseph Coat technique but I loaned that card to my friend with the others before getting a picture of it. Once I have gotten that card back I'll add it to this entry.

Tile Recipe:
Stamps: Peaceful Wishes
Ink: Craft Ink - Real Red, Chocolate Chip, Handsome Hunter, Almost Navy
Accessories: Marble Tile, Embossing Powder
Techniques: Marble Tile
Difficulty (1-Easy 5-Advanced): 2
Gift Card Pouch Recipe:
Stamps: In the Spotlight
Paper: Au Chocolate DP, Whisper White
Ink: Old Olive
Accessories: Build a Brad, Tab Punch, Large Eyelet, 5 Petal Punch, Ribbon
Techniques: Gift Card Packet/Pouch

October Technique Class - 2007

My upline had a Christmas in October Technique Class so all the projects were winter/christmas related. I loved it and was really inspired.


I ended up loaning out two of the projects to another friend before I got pictures taken so once I get those back I'll add them to this post. In the mean time I hope you enjoy the sparkle tag punch burst ornament.

I love this project the most and have made a few more since then. I plan on making a ton more too in the colors of my living room so they can go on my christmas tree next year. I wanted to make them for this year but didn't end up having enough time so it'll have to wait until next year. The other times I've made them I gave them as a hostess gift at my workshop so no picture of that one. It looked the same as this one so you're not missing out that much. The other time I just did the star part and attached it to a wedding card. I unfortunately gave the card away at the wedding before taking a picture of it. I'm going to try to replicate it for another wedding I have coming up so I'll take a picture this time and get it posted in a separate blog entry. This are sort of tricky to make but are actually really easy once you get the hang of it. You'll need both tag punches that SU sells. The easiest way to do them is to punch out the small punch and then punch the big one around it like a frame. Once you get the little punched tags you attached them to the vellum with glue. I got lazy on the engagment card and just ran them through my Xryon machine. This makes it all alot easier but you have to be careful not to tear the frames apart. I will post a tutorial with photos to make these in another blog entry sometime soon.

Friday, January 4, 2008

Quick & Easy Christmas Tags - December 2006


I made all the tags for my Christmas presents this year. Since I only had 3 sets that would work for Christmas at the time I was limited in what I could come up with but I think I did a pretty good job. Not to mention the presents had to be wrapped and delivered in less then 2 hours.
I used a variety of stamps from Quick Cards, Sleigh Full of Toys, Snow Flurries, and one other can't remember the name. I used basic black, brilliant blue, and bashful blue inks. The paper was just scraps of non-SU that I had and of course color pencils to color in the designs.


Wednesday, January 2, 2008

MAP CHALLENGE #1 - Winner

The winner for the first monthly map challenge is .... Colleen Wheat.

Congrats Colleen!!!! Your prize will be mailed to you shortly. I hope you enjoy it.


Attached is a picture of her submission using the sketch provided in an earlier post. She used all Stampin' Up products.

The paper is Real Red, Old Olive, Whisper White, and the now retired Dashing Designer Series Paper. She used Real Red and Old Olive Ink, and various hole punches. If you have any questions for her please let me know and I'll do what I can to find out and reply to you.

Wednesday, December 26, 2007

Christmas Scrapbook Page

Here is a scrapbook page I made for an online yahoo/msn craft group I belong to. I hope you enjoy the page. The initial idea was obtained from SCS but I ended up changing the design slightly.

All products are Stampin' Up. I used Season of Joy stamp set, real red, old olive, whisper white card stock and dashing designer paper, Pewter hardware, and the ticket corner punch and 1 1/4 circle punch. I can't remember the name of the other corner punch. I used old olive organza ribbon and real red gingham. And of course the SU Markers, classic ink - Real Red & Old Olive.

Wednesday, November 14, 2007

Christmas in July Swap - May 2007


I made this for a Christmas in July card swap I'm involved in. I decided I wanted to make several cards and send them out in a little packet. I had just did the dazzling diamonds technique in class and really loved it. Actually I just love sparkles and the fact that this gave me an excuse to play in my sparkles and create a cool card using embossing was the greatest thing ever.


CARD RECIPE #1:

Stamps: Merry, All Year Cheer
Paper: Bashful Blue, Real Red, Sage Shadow, Gloss White
Ink: Blue Stazon, Real Red, Versamark
Accessories: Gingham Ribbon, Slit Punch
Techniques: Dazzling Diamonds


I made this card by casing another card on SCS for part of my Christmas in July swap package. Sorry I can't recall at this time who it was I cased. They did a wonderful job and though I changed a few things I didn't change much. Thanks for the idea and inspiration.

CARD RECIPE #2:
Stamps: Big Pieces, Sincere Salutations, Snow flurries
Paper: Real Red, Whisper White, Garden Green
Ink: Garden Green, Real Red
Accessories: Non Su Brad, Ribbon, Button, Retired SU Silver Cord
Techniques: OSW
Difficulty (1-Easy 5-Advanced): 1

Friday, March 16, 2007

Christmas Candy Baggie - Dec 2006

I can't believe I forgot one of my favorite projects. I guess that's what I get for putting it in a different folder. I love making these little baggies of candy. At first I was really closed minded about them and thought you can only put candy in them by since then I have opened my mind and realized that I could put just about anything in them.... all I would need to do is get a different size baggie and that wouldn't always be the case. These are so quick & easy to make that I plan on making more to pass out at Halloween. The best part is they can be customized to fit any occasion or holiday. You just change the colors of the paper, ink, and the change the stamp set and you're all ready for the next holiday. It's great fun too. They would make great baby/wedding shower favors, school treats, party favors... the list could go on and on. If any of my friends are interested in making some for any event they have coming up let me know and I'd be more then happy to help you out. For the baggie pictured here I used Stampin' Ups Quick Cards Set and Snow Flurries Set. I used Bashful Blue, Whisper White, and Certainly Celery card stock. Of course the ink is also Certainly Celery. Got to love the SU Color names.

Save the Date - Jan 07

As a result of my instant obsession and addiction to stamping I volunteered to make my newly engaged friend save the date cards for her upcoming wedding. Little did I know what I was getting myself into. It was alot of fun though I'm not sure if I'll do that much embossing every again. I still seem to get glitter/embossing tinsel on me everytime I enter the craft area of my basement. Here is the design I created and I want to give a special Thanks to Nikki who helped me make these. I ended up making about 100 of these cards.
They were really easy to make once we got the hang of it and formed our little system. The tricky part was the snow flakes on the background. We used the SU Stampin' Around Snowflakes wheel for that part and rolled it in clear embossing ink. We had to do 2 sides at a time since we had no way to hold the paper we did all 4 at once. We also ran into a similar probably for the middle part where I used a store bought stamp saying Save This Date. The heat tool gets so warm that you can't really hold the paper yourself when it's this small. I cut all the pieces first. I ended up using a wooden cloths pin to hold the paper and then heat the embossing tinsel. This was the only way at the time I could come up with so that my fingers didn't get burnt from holding the paper so close to the heating tool. I've since been told that if you put alumnimum foil around a wood clipboard that you can just lay the items you're heat embossing flat on it and it won't scrotch the table underneath it. I wish I had know this then. LOL. The cards turned out very good I think, especially for someone who was just beginning. Any of my friends who see these and would like me to help them for any of their upcoming events let me know and we can work something out.

Tuesday, March 6, 2007

My First Technique Class - Nov 2006


Shortly after attending the stamp camp... like 3 days... I signed up for a techniques class in Springfield. I thought if I was going to take the hobby of rubber stamping seriously and continue to make cards that didn't look like cheap art projects that a
2nd grader might have done then I as going to have to learn some of the fancy techniques and get into some groups with other stampers. It was clear to me after attending this class that I was hooked and there would be no easy escape from the stamping world. These are the items that I created at my first techniques' class. I had a blast and of course I ordered more supplies so I could duplicate some of the projects. Though I haven't created any duplicate items I have used the pattern layout of the snowman bag and the candy baggie to make items that are similiar yet very different. Those pictures will be showcased in another blog entry.

Friday, March 2, 2007

My First Stamp Camp Experience - Nov 2006

I am finally getting a chance to post some of my past designs and current designs for everyone to see. This will be broken down into several entries based on when I created the design.

These first pictures are of the first cards I made at the November Stamp Camp. Unfortunately the stamp sets used were only available until the end of November or December and I didn't get a chance to order them. It's okay though because since then I have ordered several different stamp sets that are just as great as the ones used for these projects.


This second set of pictures are from the second set of cards I made at the stamp camp. I liked the hostess's sample card a lot but wasn't as happy with the way mine turned out. They're pretty good still though. I definitely liked the first set better though. I also didn't get a chance to buy the stamp sets used for this card. I did however manage to get some of the paper though.


The last card I made at Stamp Camp is my favorite. I liked it so much that I bought all the supplies necessary to make more cards just like it. I have yet to do so because of all the new cards and stamp sets but that's okay. I still like it a lot. Not bad for 1 day's work and being a rookie... if I do say so myself. If you like what you see here and are interested in finding out more on how to become a Stampin' Up Customer, Hostess, or Demonstrator check out my website at... http://fayemitchell.stampinup.net/